> ## Documentation Index
> Fetch the complete documentation index at: https://docs.datazone.co/llms.txt
> Use this file to discover all available pages before exploring further.
# Google Workspace SAML Setup
> Configure SAML authentication with Google Workspace
 ## Prerequisites
* Administrator access to your Google Workspace account
* Your Datazone instance domain (e.g., `app.datazone.co`)
## Configuration Steps
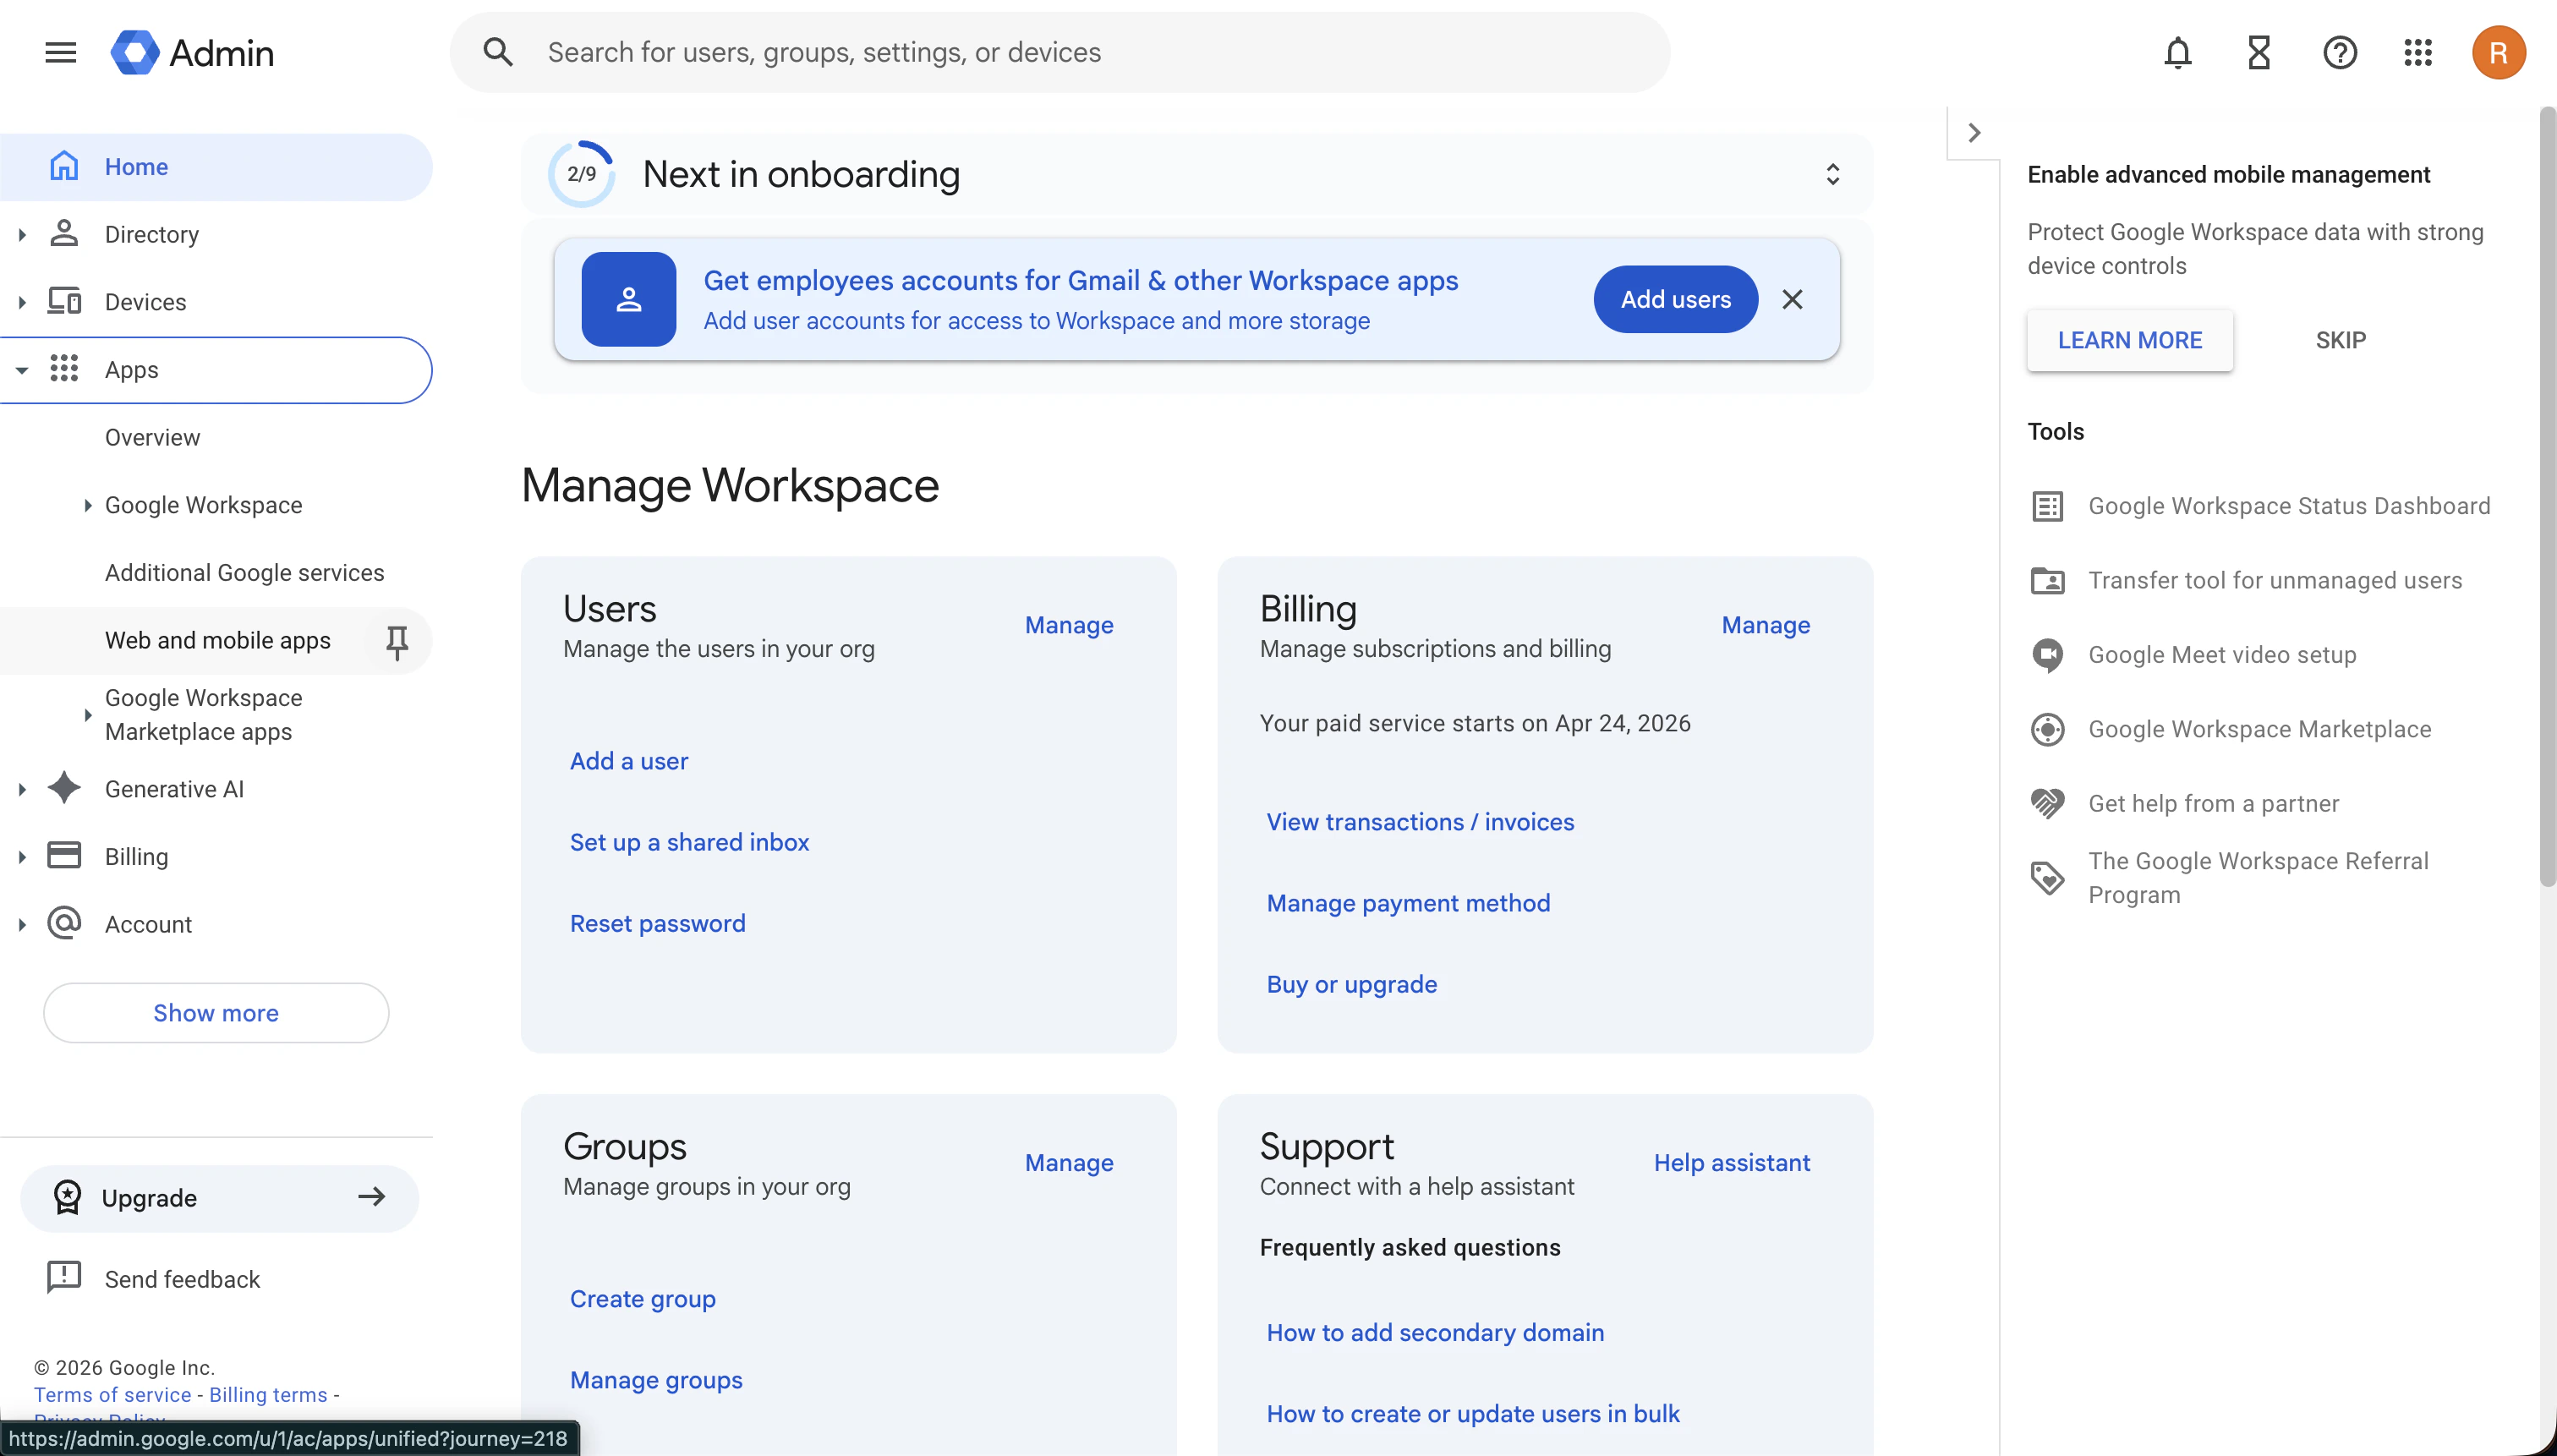
### 1. Access Web and Mobile Apps
In your [Google Admin Console](https://admin.google.com/ac/apps/unified), navigate to **Apps** > **Web and mobile apps** from the left sidebar menu.
## Prerequisites
* Administrator access to your Google Workspace account
* Your Datazone instance domain (e.g., `app.datazone.co`)
## Configuration Steps
### 1. Access Web and Mobile Apps
In your [Google Admin Console](https://admin.google.com/ac/apps/unified), navigate to **Apps** > **Web and mobile apps** from the left sidebar menu.
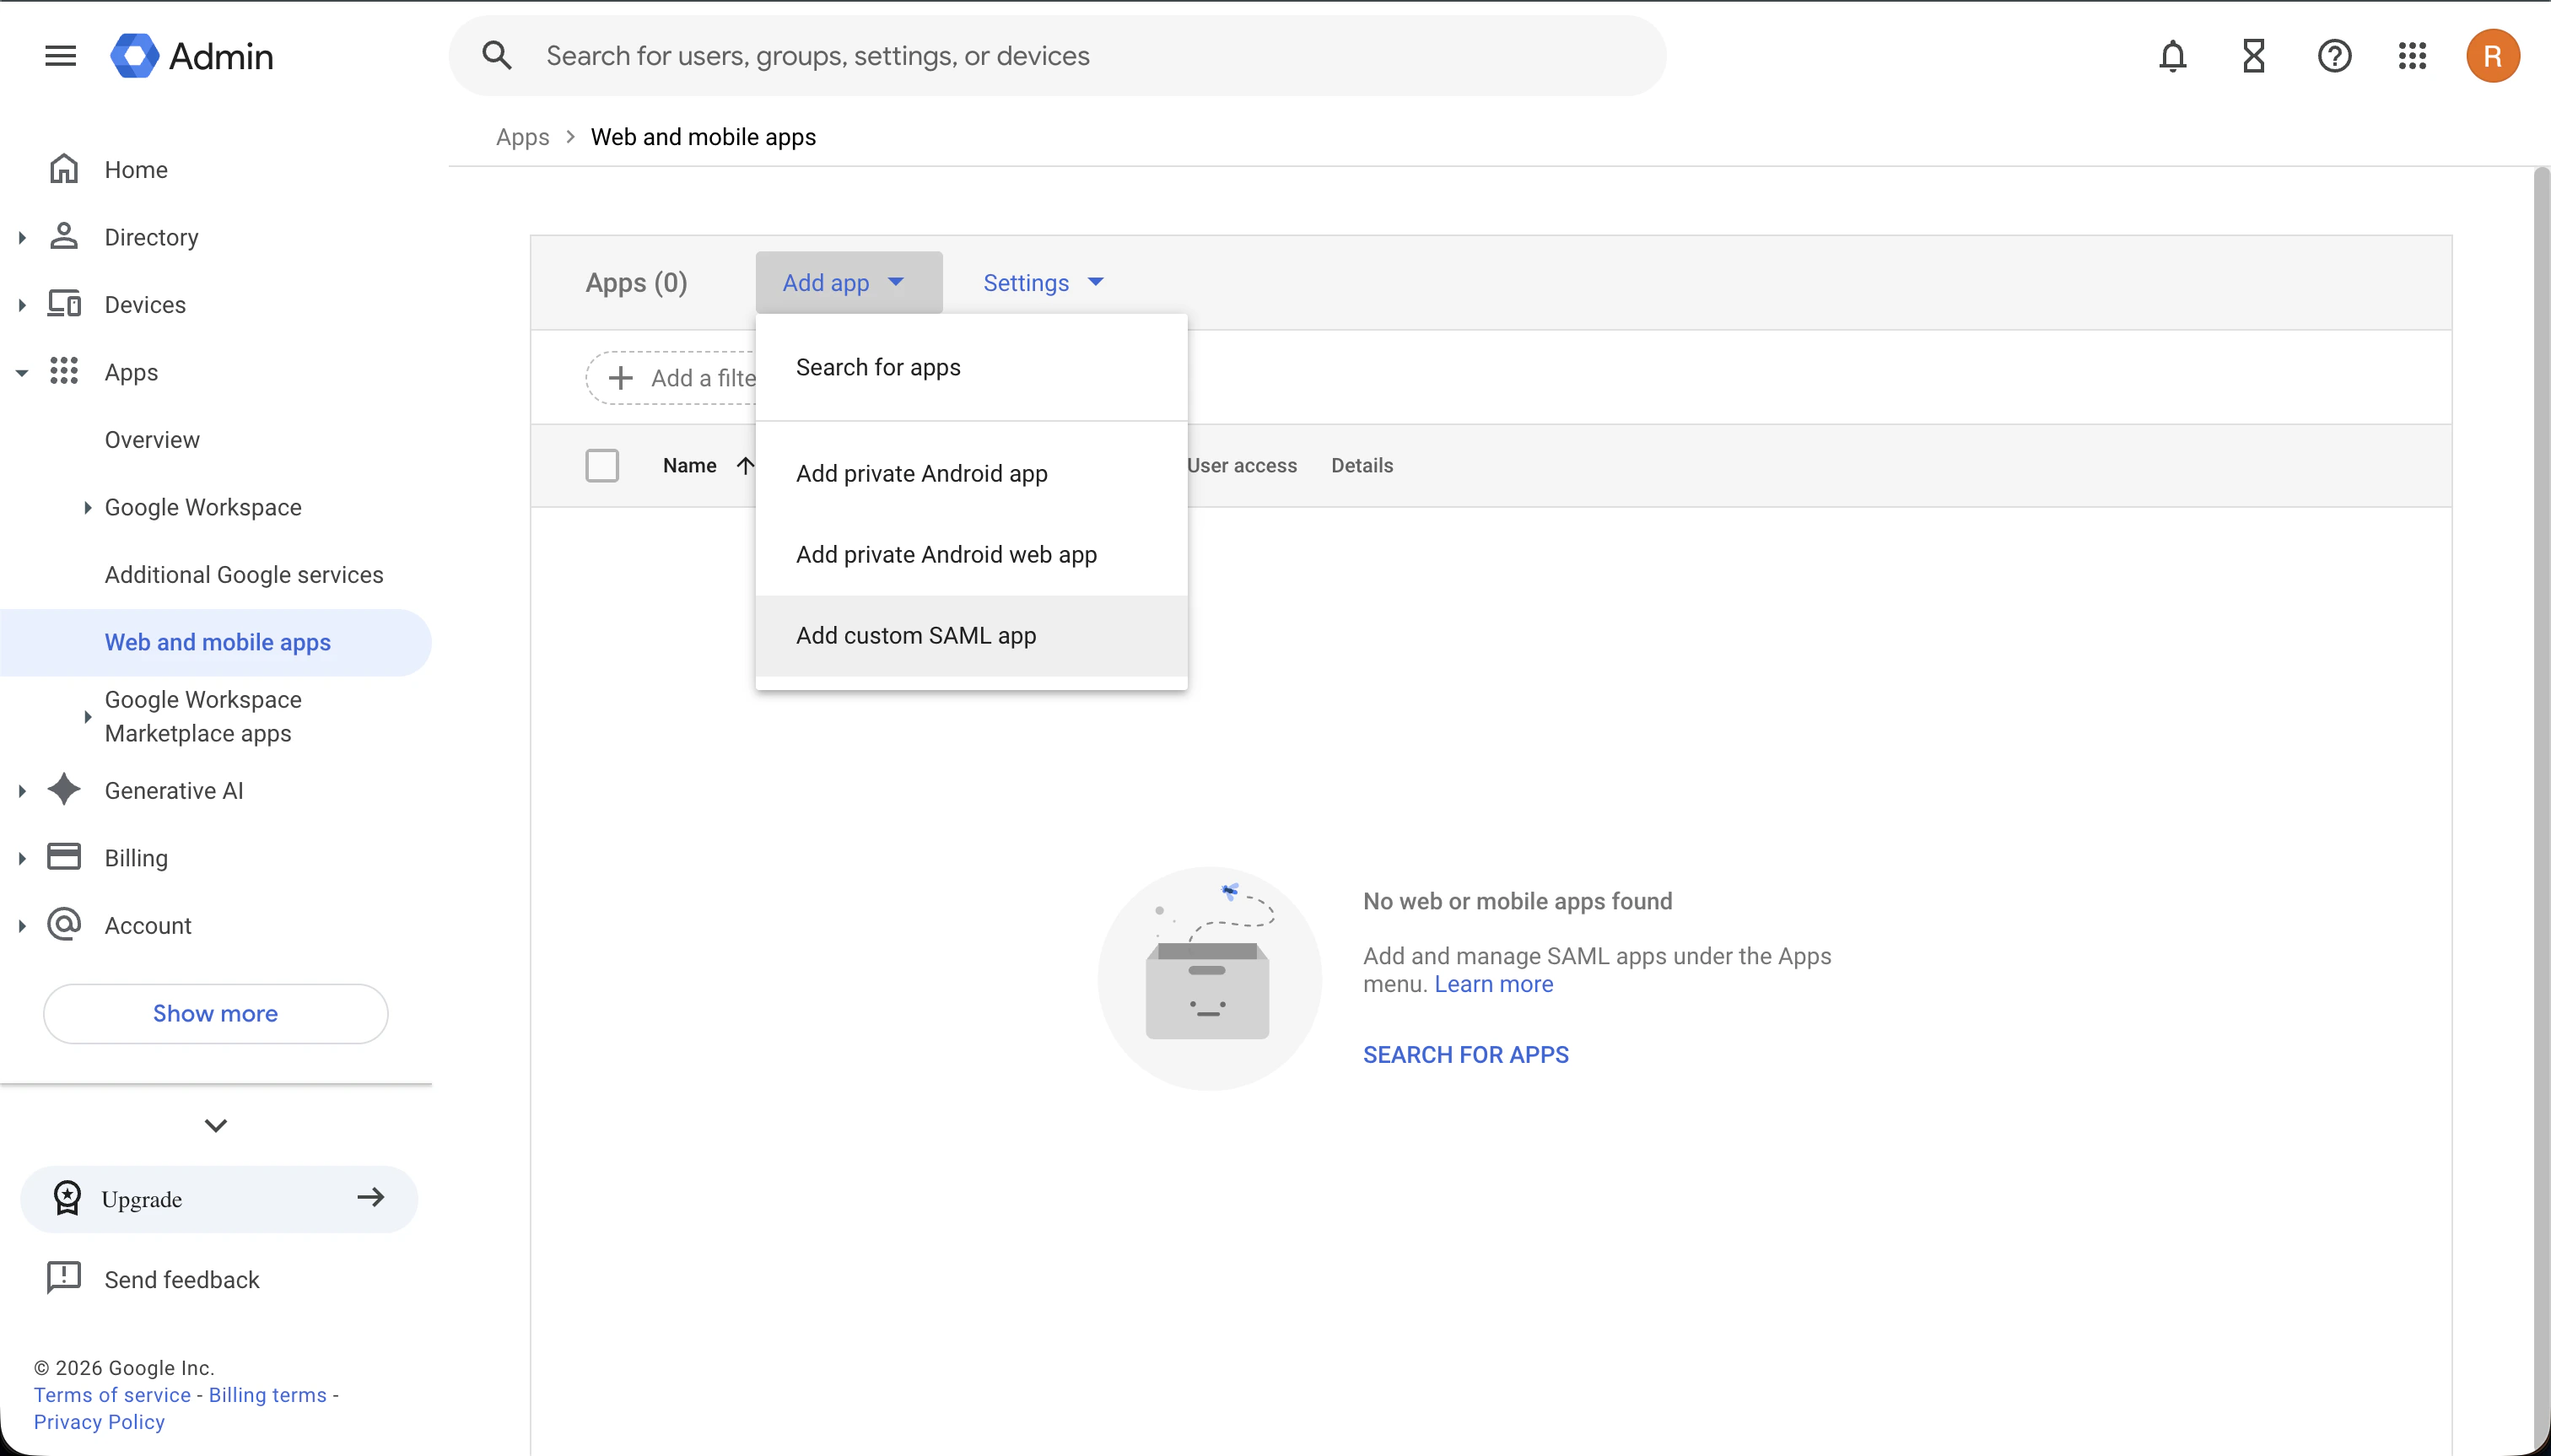
 ### 2. Add Custom SAML App
Click **Add app** and select **Add custom SAML app** from the dropdown menu.
### 2. Add Custom SAML App
Click **Add app** and select **Add custom SAML app** from the dropdown menu.
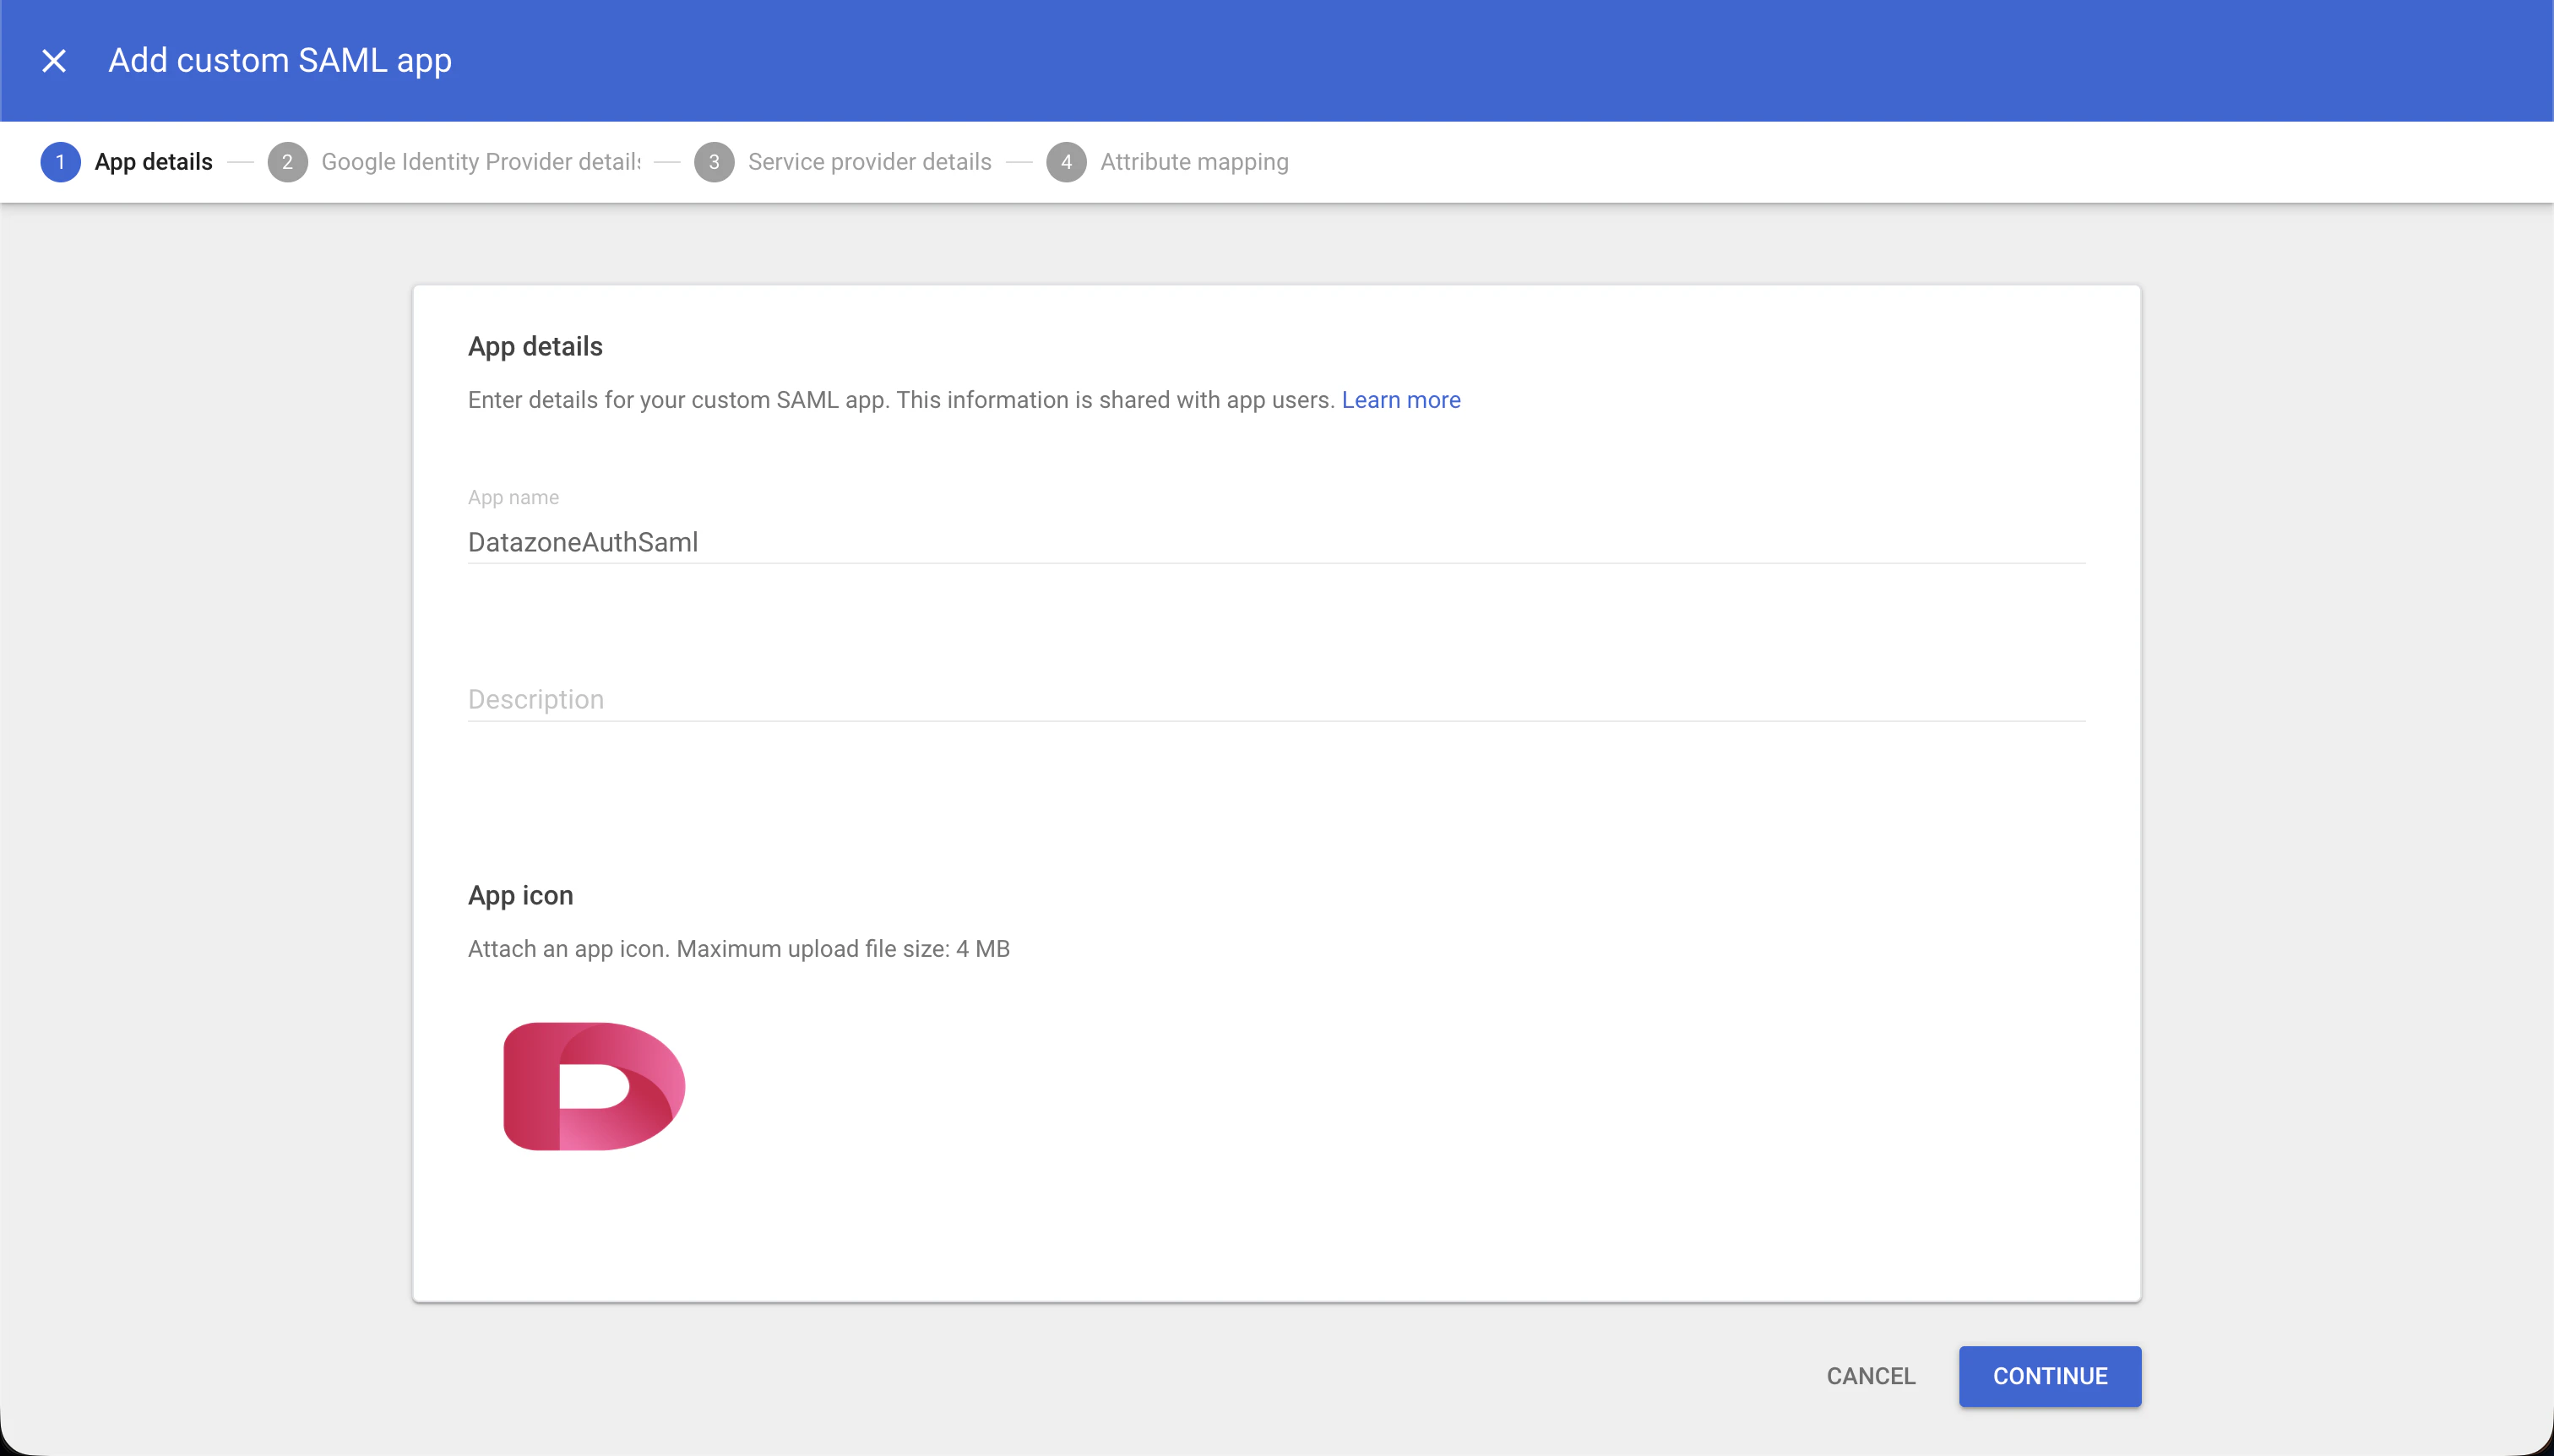
 ### 3. Configure App Details
Provide a name for the application (e.g., "Datazone SSO"). You can optionally add an icon for the application.
### 3. Configure App Details
Provide a name for the application (e.g., "Datazone SSO"). You can optionally add an icon for the application.
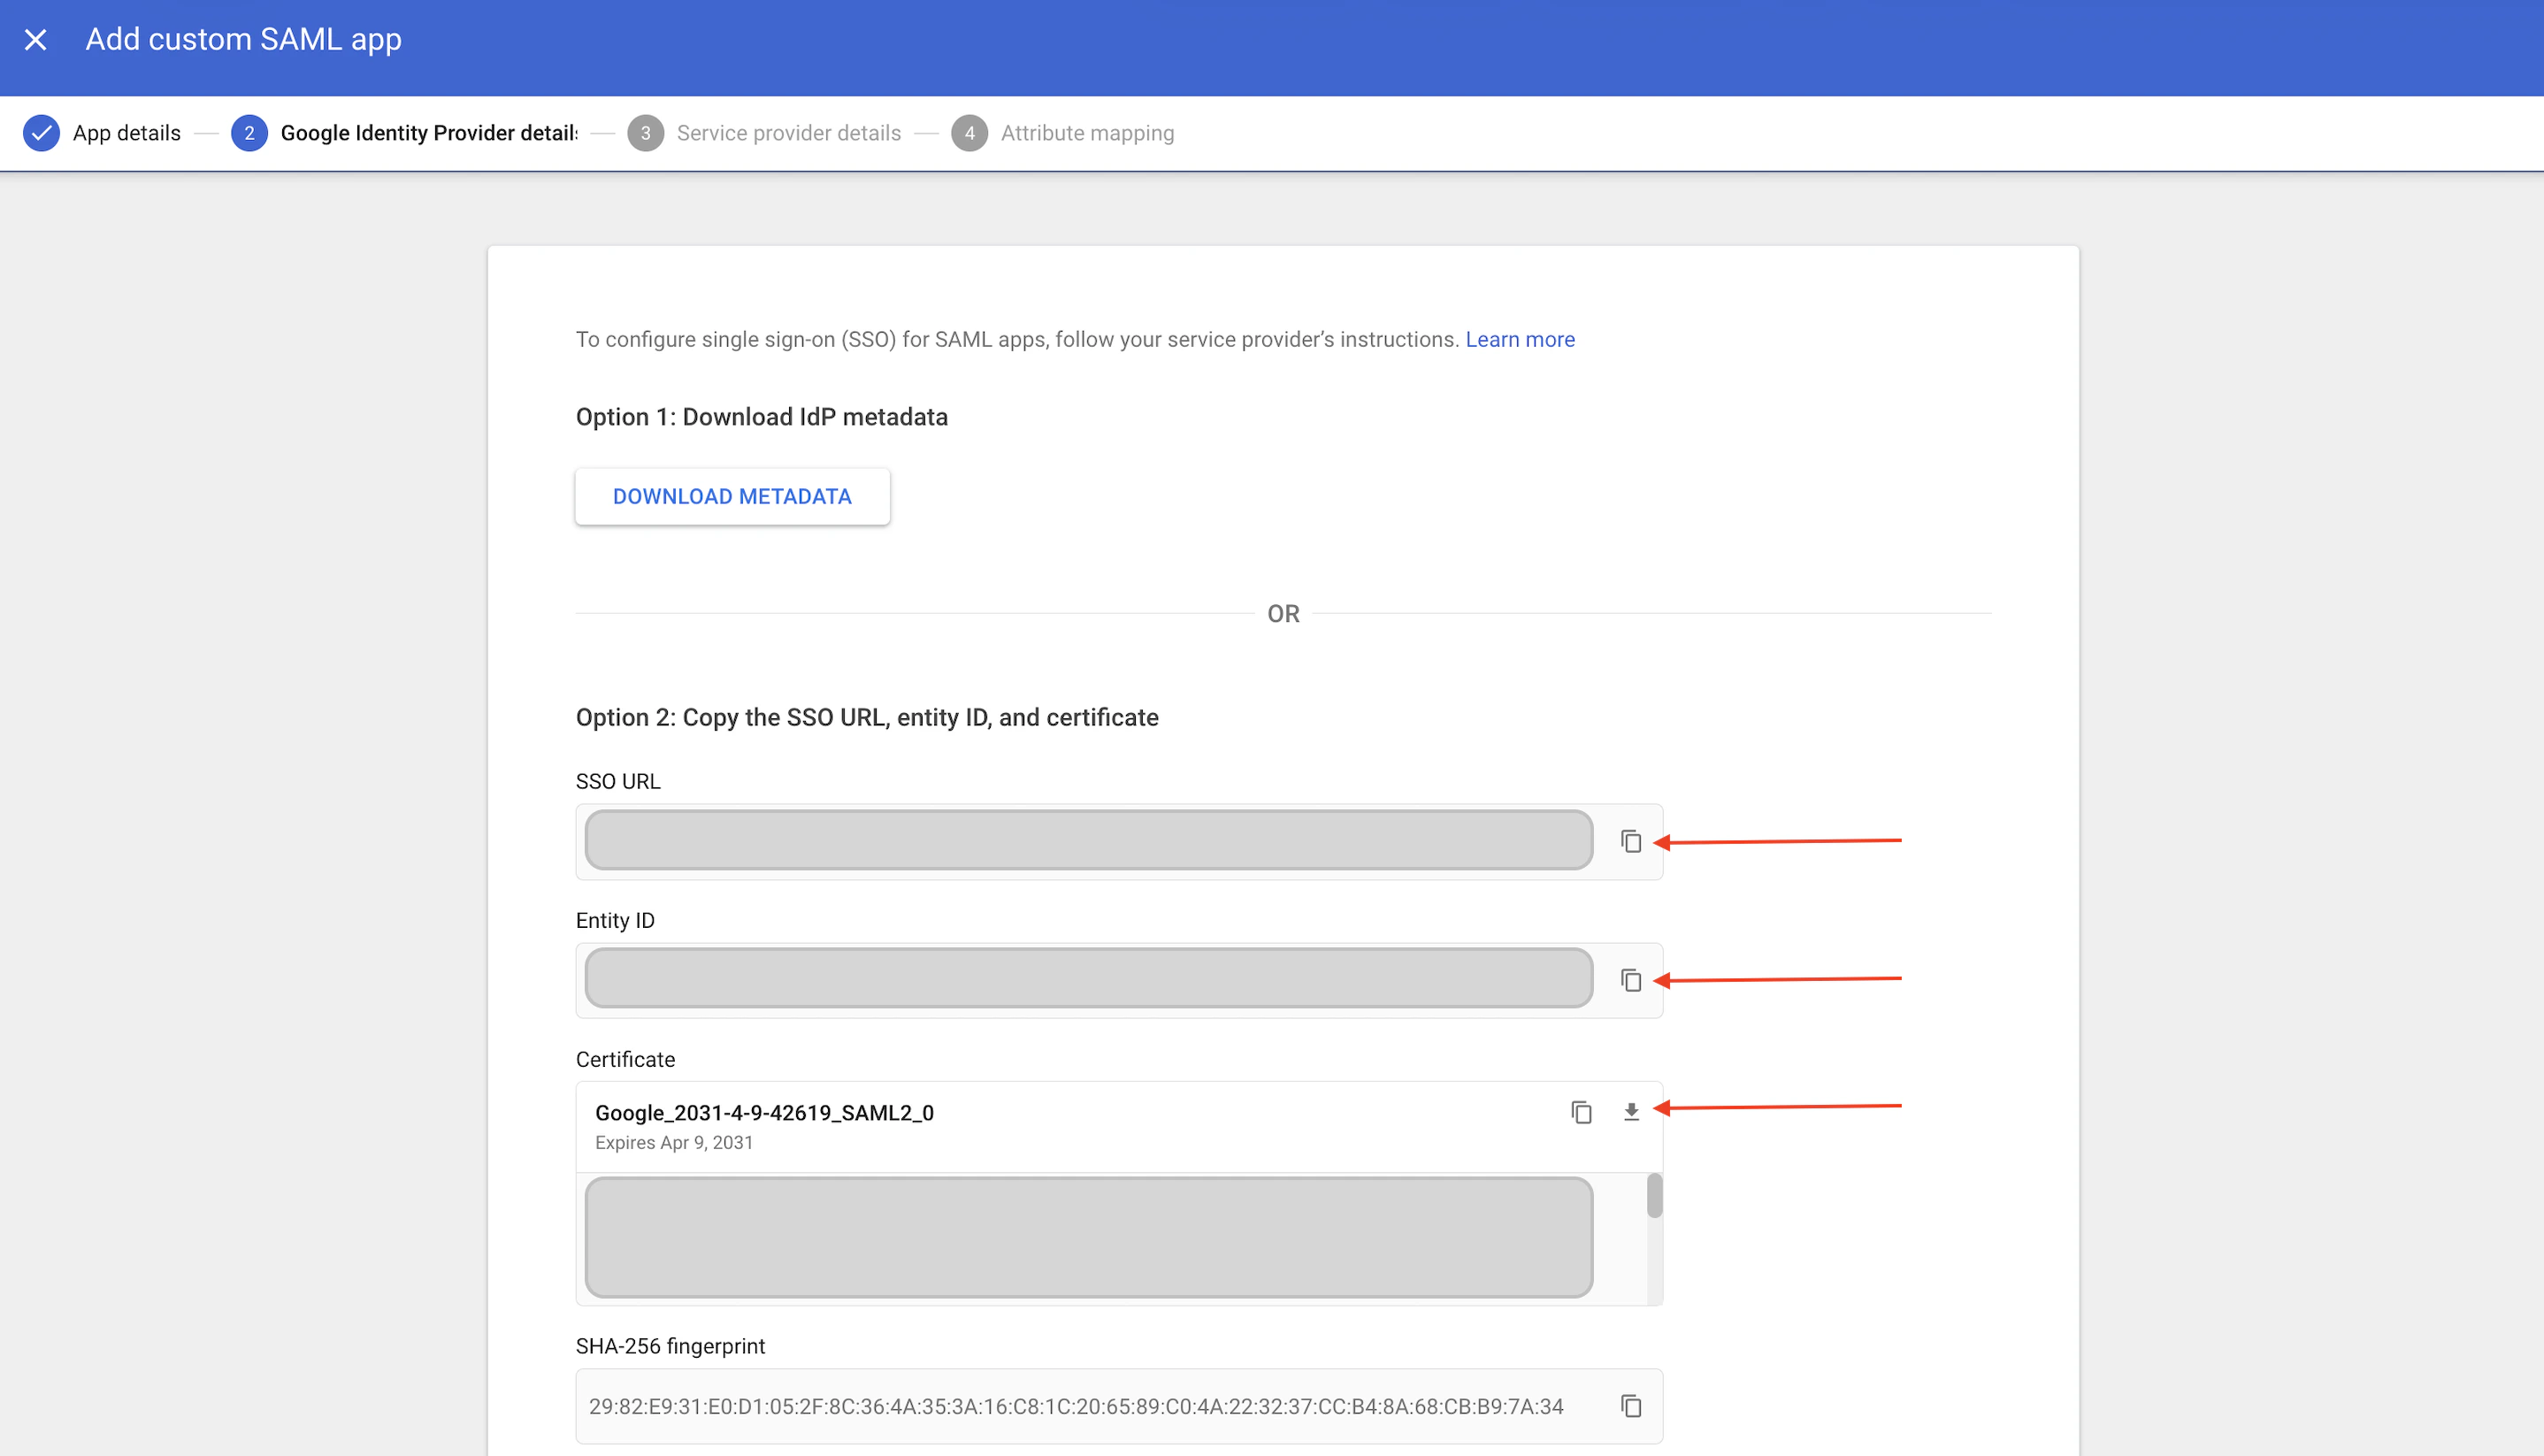
 ### 4. Collect Google Identity Provider Details
Google will display the following configuration details that you'll need for Datazone:
* **SSO URL**: Identity Provider Single Sign-On URL
* **Entity ID**: Identity Provider Issuer
* **Certificate**: Download the certificate (PEM format)
Make sure to save these details securely. You'll need them to configure SAML
in Datazone.
### 4. Collect Google Identity Provider Details
Google will display the following configuration details that you'll need for Datazone:
* **SSO URL**: Identity Provider Single Sign-On URL
* **Entity ID**: Identity Provider Issuer
* **Certificate**: Download the certificate (PEM format)
Make sure to save these details securely. You'll need them to configure SAML
in Datazone.
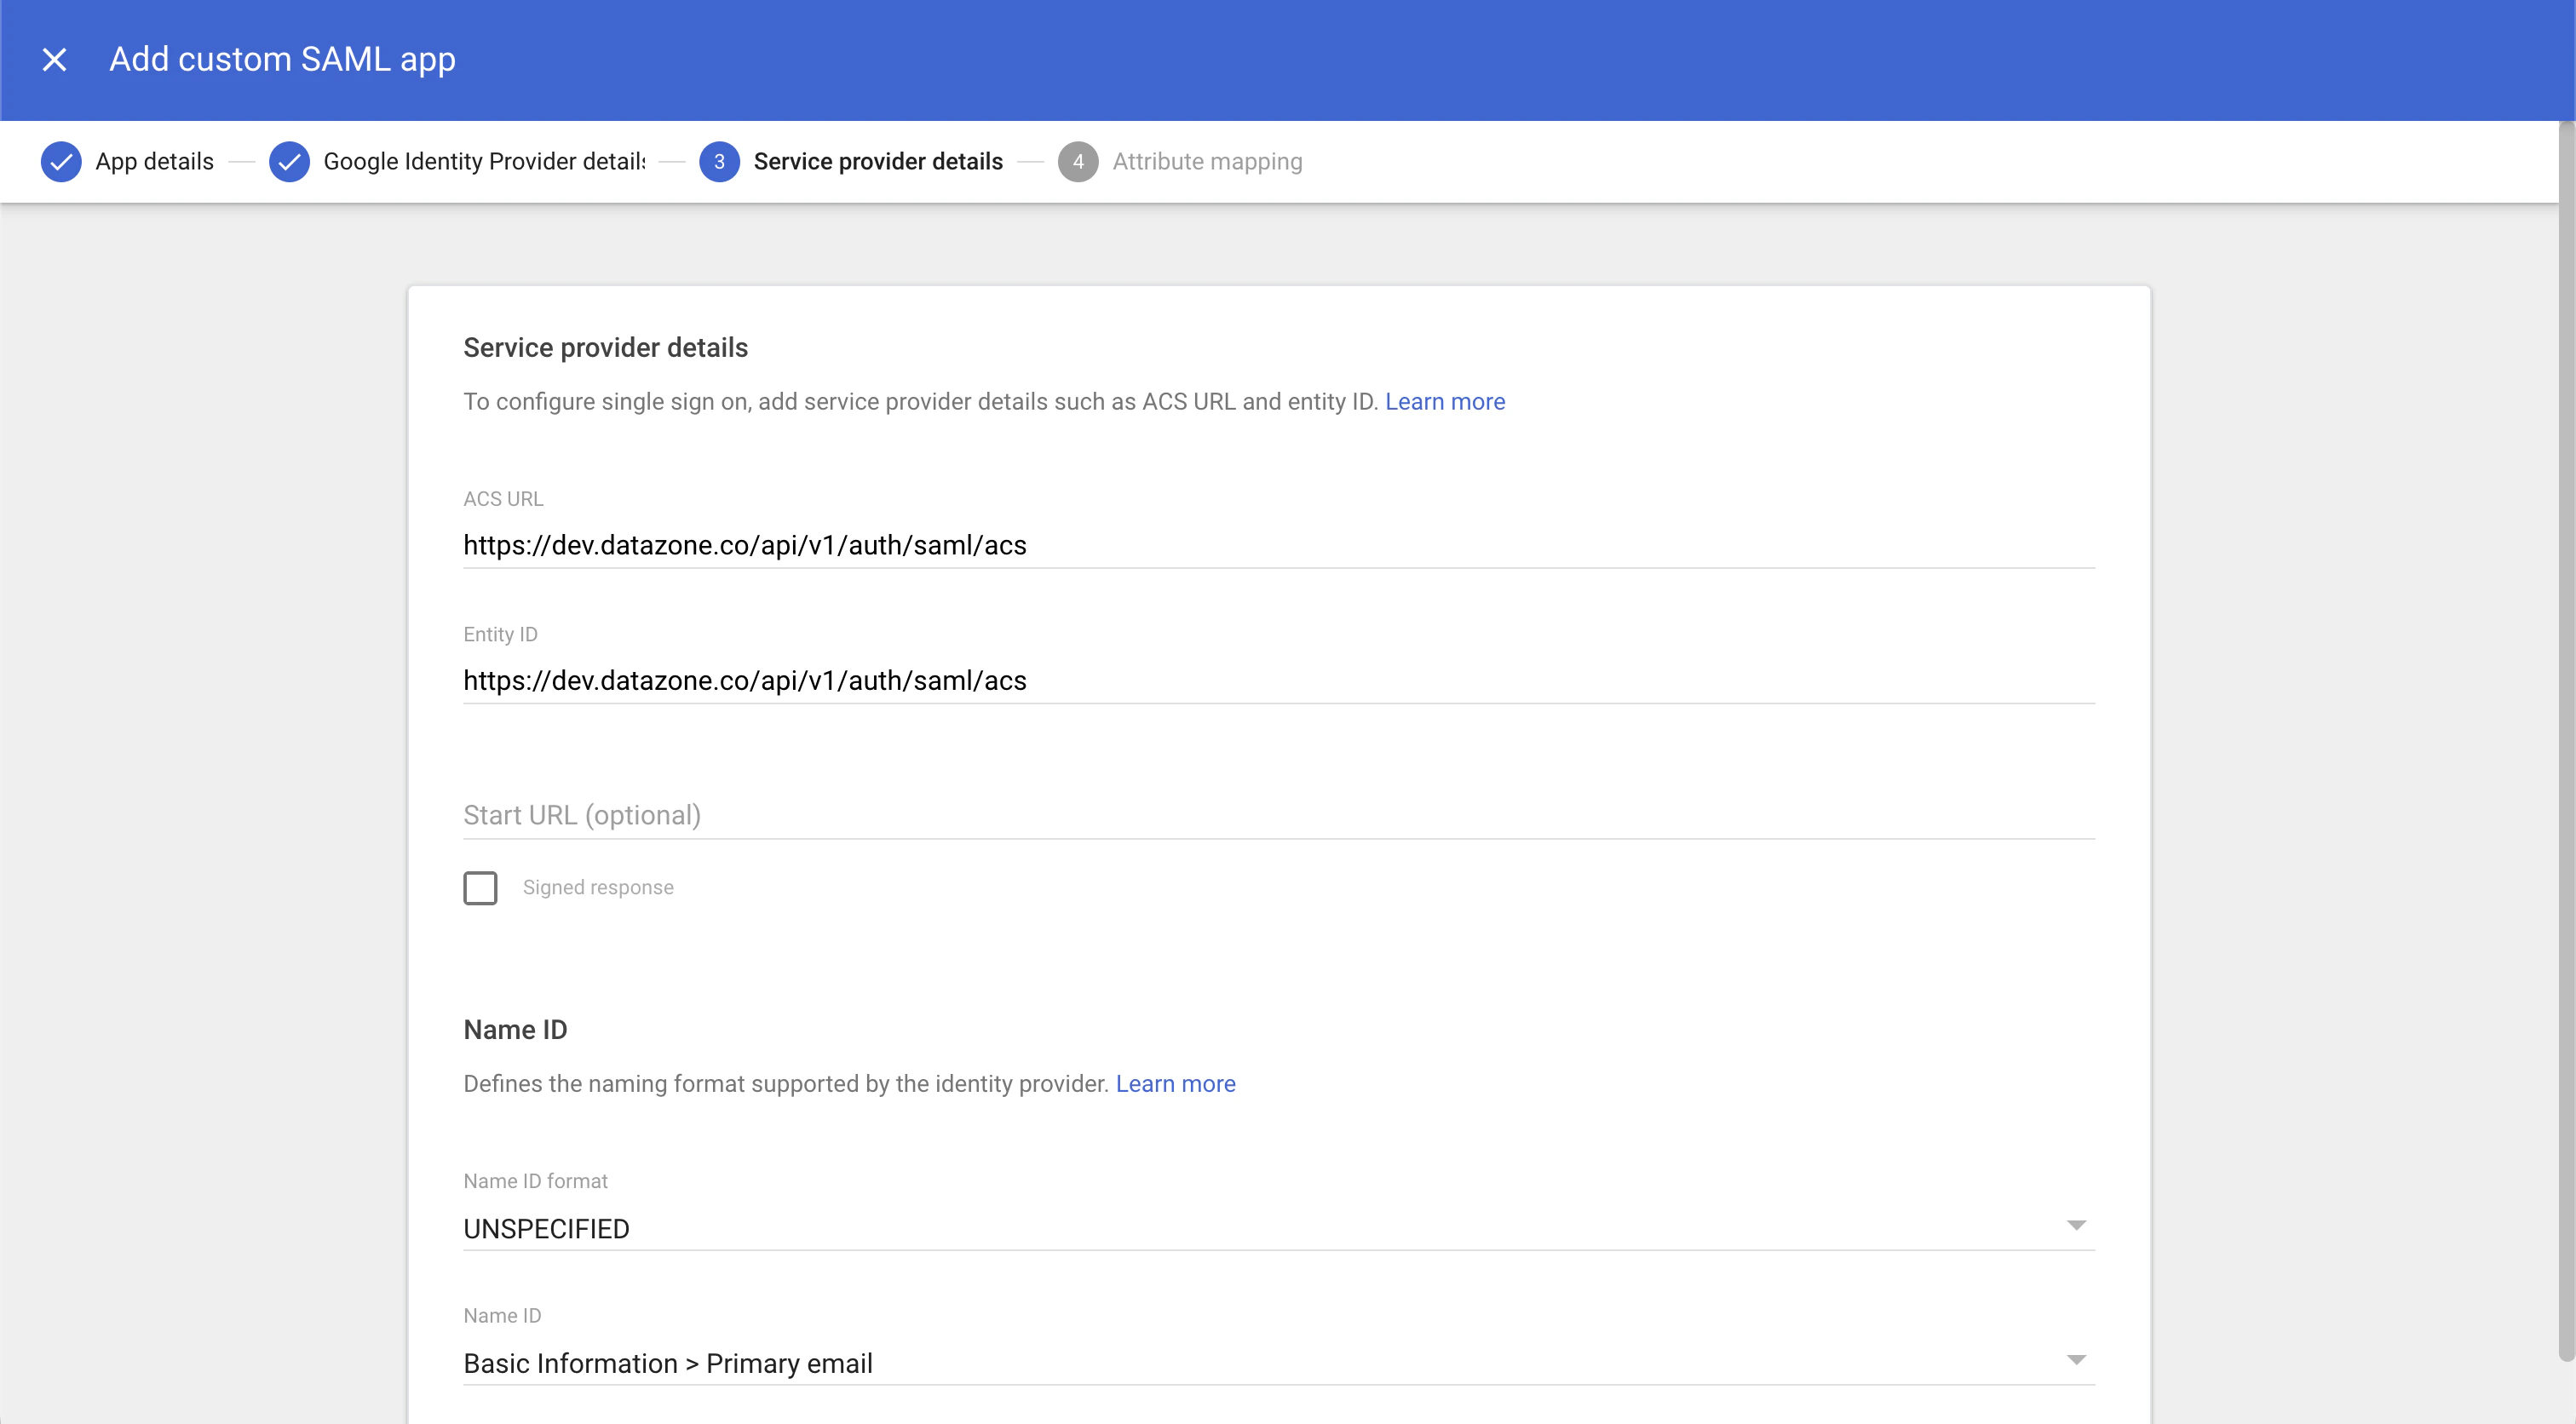
 ### 5. Configure Service Provider Details
In the **Service provider details** section, set the following parameters:
* **ACS URL**: `https://YOUR_DATAZONE_DOMAIN/api/v1/auth/saml/acs`
* **Entity ID**: `https://YOUR_DATAZONE_DOMAIN/api/v1/auth/saml/acs`
Leave the rest of the form with default values.
Replace `YOUR_DATAZONE_DOMAIN` with your actual Datazone instance domain.
### 5. Configure Service Provider Details
In the **Service provider details** section, set the following parameters:
* **ACS URL**: `https://YOUR_DATAZONE_DOMAIN/api/v1/auth/saml/acs`
* **Entity ID**: `https://YOUR_DATAZONE_DOMAIN/api/v1/auth/saml/acs`
Leave the rest of the form with default values.
Replace `YOUR_DATAZONE_DOMAIN` with your actual Datazone instance domain.
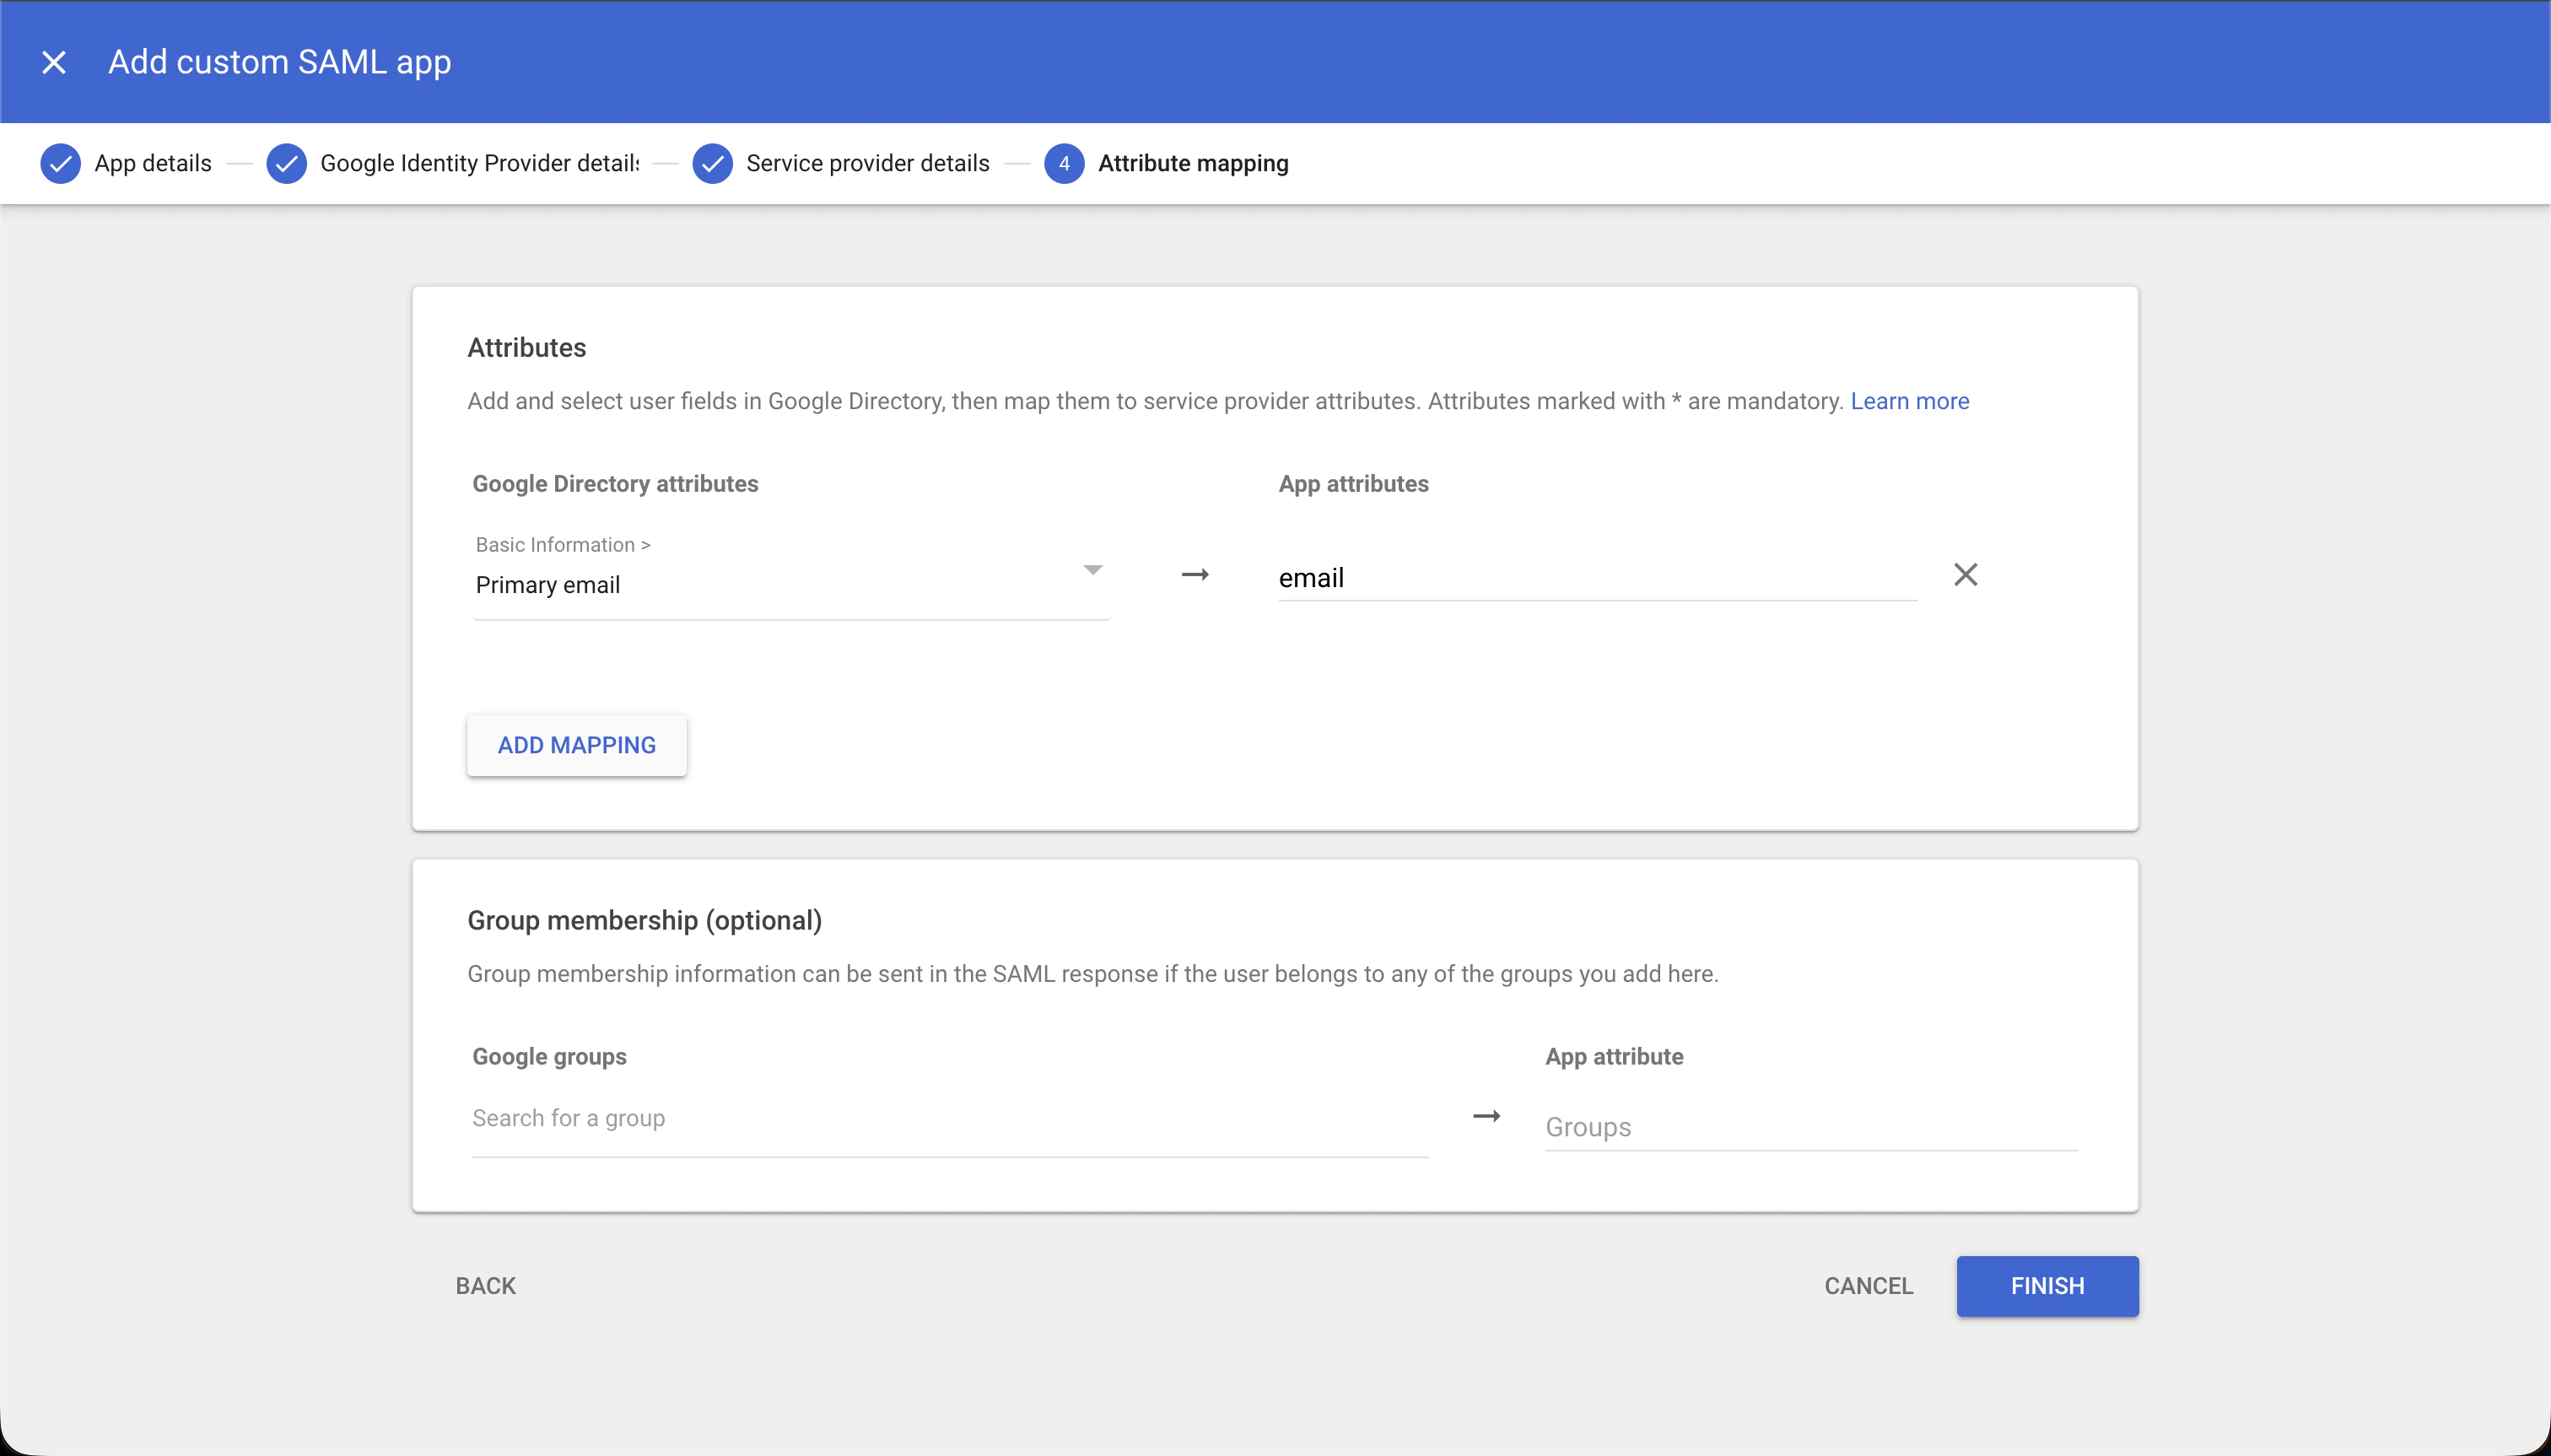
 ### 6. Add Attribute Mapping
In the **Attribute mapping** section, add the following mapping:
| Google Directory attributes | App attributes |
| --------------------------- | -------------- |
| Primary email | `email` |
### 6. Add Attribute Mapping
In the **Attribute mapping** section, add the following mapping:
| Google Directory attributes | App attributes |
| --------------------------- | -------------- |
| Primary email | `email` |
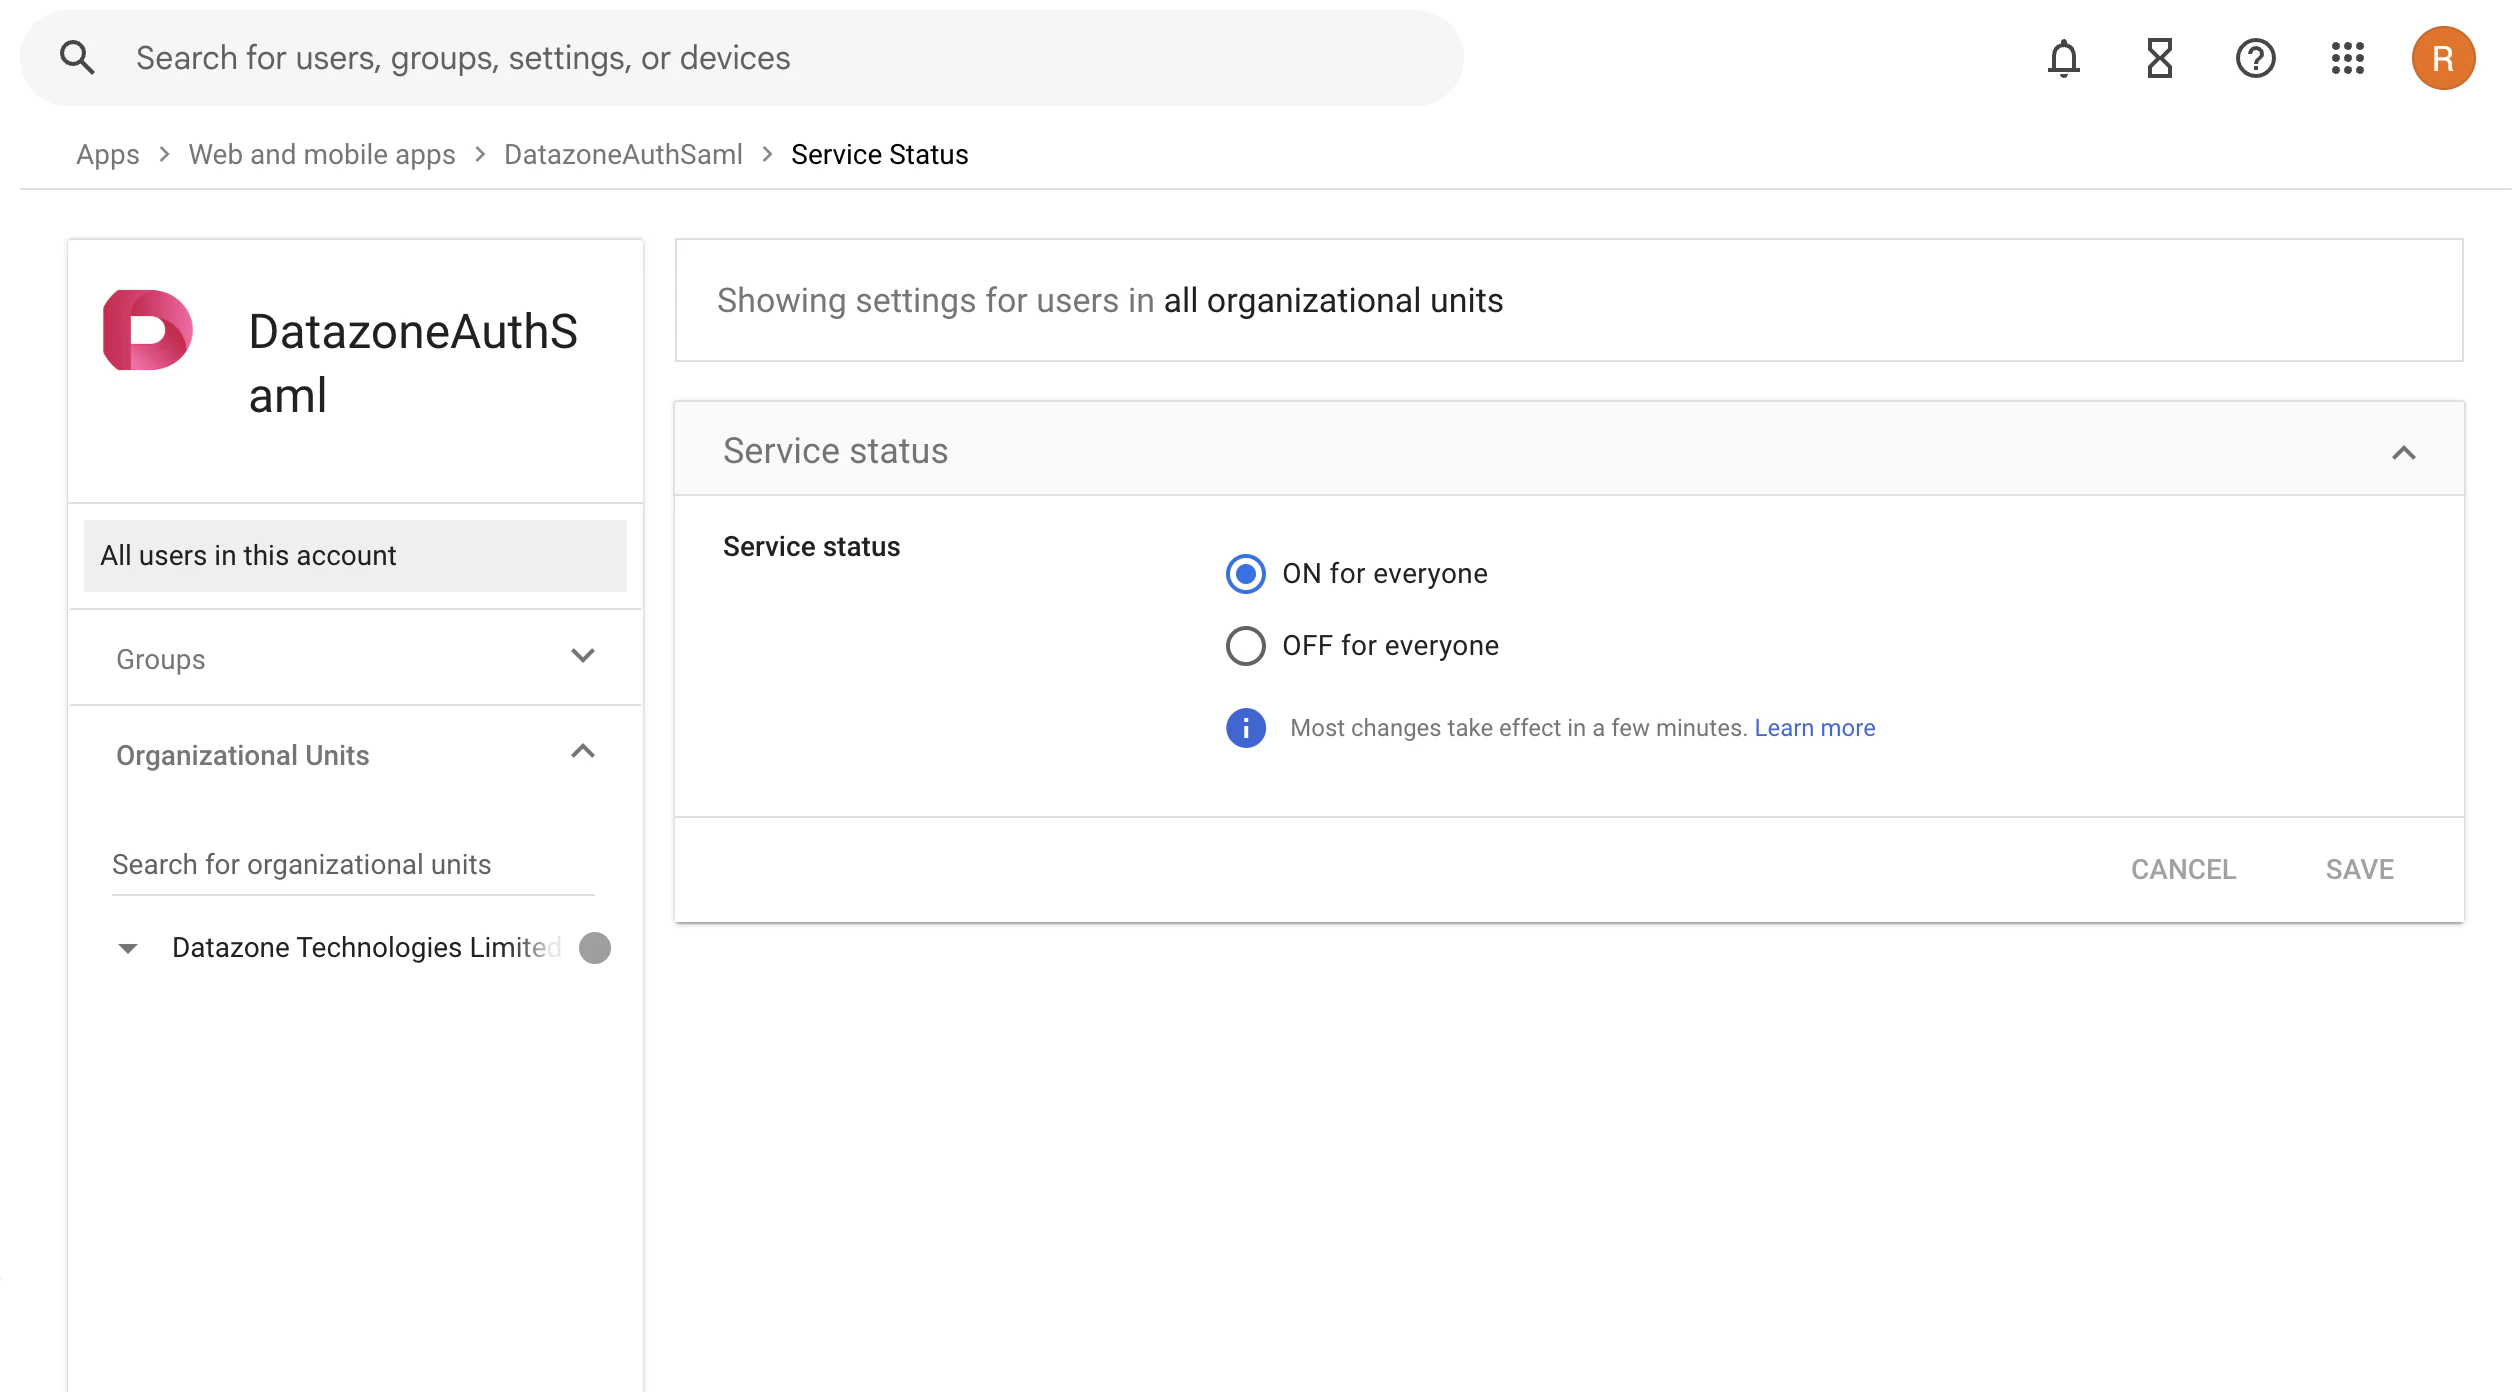
 ### 7. Configure User Access
After the app is created, you'll see the **User access** section on the main app page. Configure which users or organizational units should have access to Datazone through Google SSO.
### 7. Configure User Access
After the app is created, you'll see the **User access** section on the main app page. Configure which users or organizational units should have access to Datazone through Google SSO.
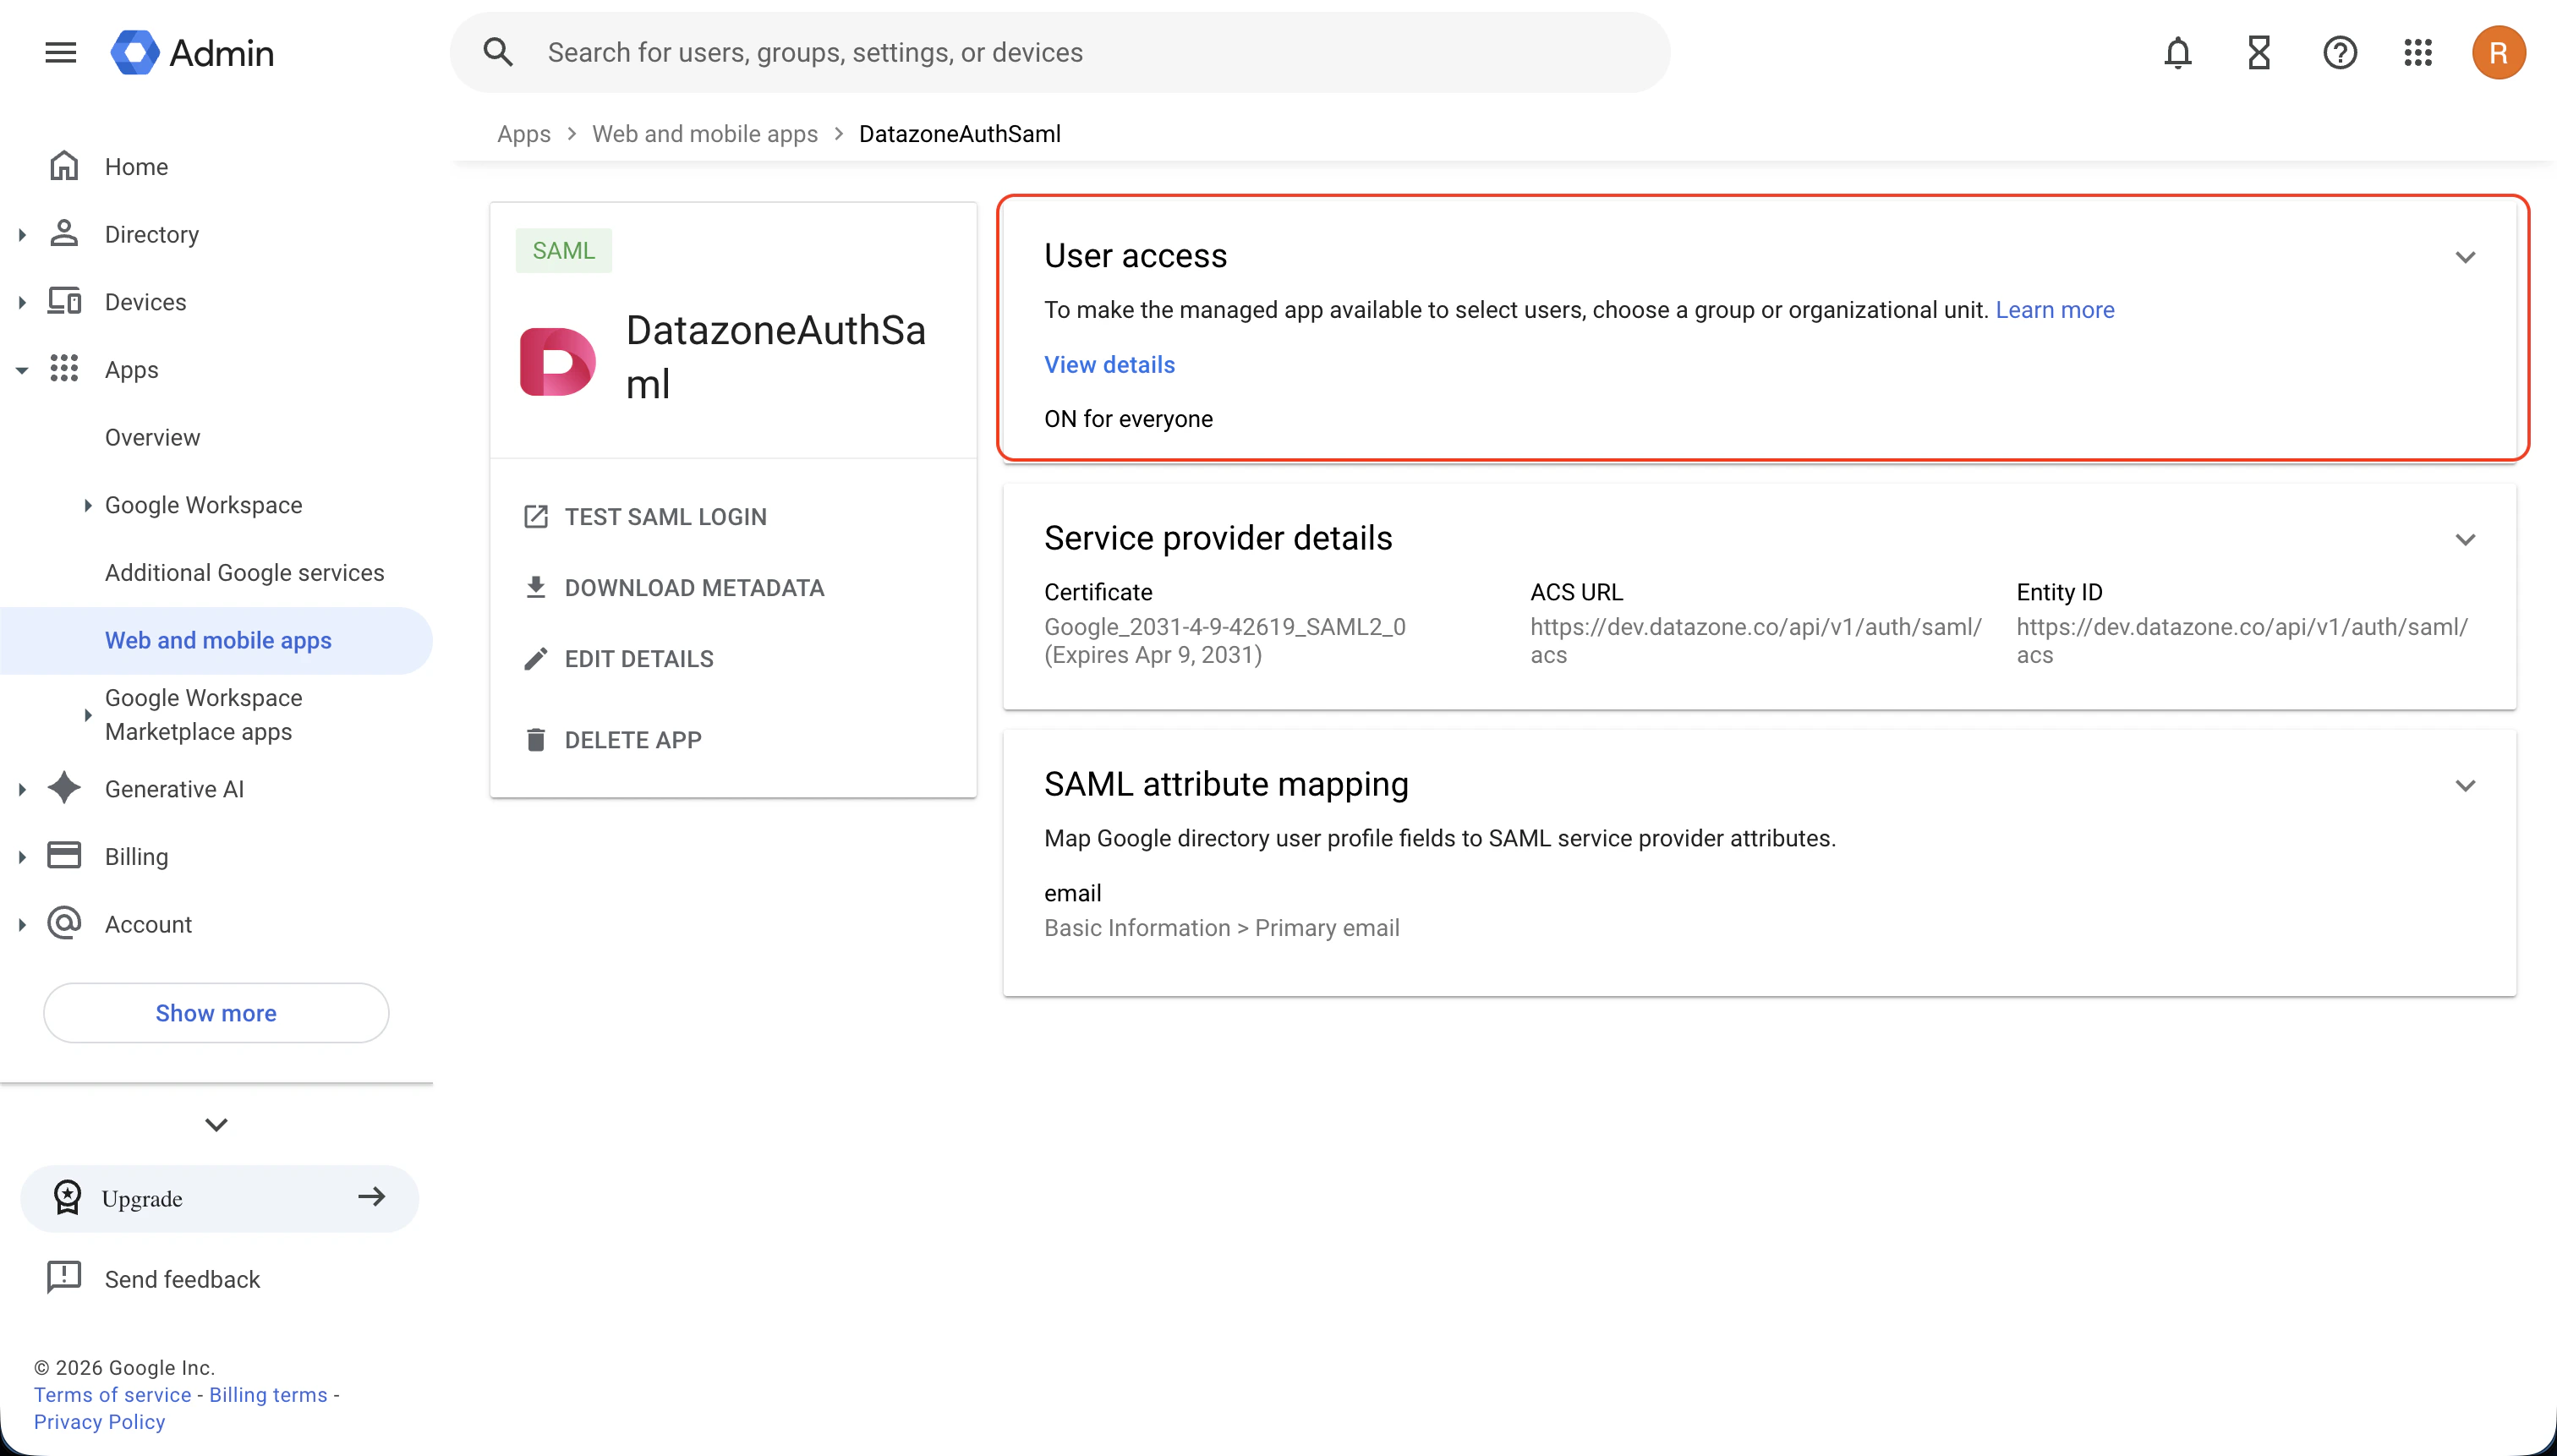 ### 8. Assign Users to the App
Assign the appropriate users or groups to the application to control who can access Datazone through Google Workspace SSO.
### 8. Assign Users to the App
Assign the appropriate users or groups to the application to control who can access Datazone through Google Workspace SSO.
 ### 9. Enter Configuration in Datazone
Finally, enter the collected information from Step 4 into the Datazone SAML configuration settings as described in the [SAML Overview](overview) guide:
* **Entity ID (Issuer)**: Use the Entity ID from Google
* **SSO URL**: Use the SSO URL from Google
* **Certificate**: Upload the downloaded certificate (PEM format)
## Testing Your Configuration
After completing the setup:
1. Navigate to your Datazone login page
2. Click on the SSO/SAML login option
3. You should be redirected to Google for authentication
4. Upon successful authentication, you'll be redirected back to Datazone
## Additional Resources
For more information about configuring custom SAML applications in Google Workspace, refer to [Google's official documentation](https://knowledge.workspace.google.com/admin/apps/set-up-your-own-custom-saml-app).
If you encounter any issues during setup, refer to the [SAML troubleshooting
guide](overview#troubleshooting) or contact support at [support@datazone.co](mailto:support@datazone.co)
### 9. Enter Configuration in Datazone
Finally, enter the collected information from Step 4 into the Datazone SAML configuration settings as described in the [SAML Overview](overview) guide:
* **Entity ID (Issuer)**: Use the Entity ID from Google
* **SSO URL**: Use the SSO URL from Google
* **Certificate**: Upload the downloaded certificate (PEM format)
## Testing Your Configuration
After completing the setup:
1. Navigate to your Datazone login page
2. Click on the SSO/SAML login option
3. You should be redirected to Google for authentication
4. Upon successful authentication, you'll be redirected back to Datazone
## Additional Resources
For more information about configuring custom SAML applications in Google Workspace, refer to [Google's official documentation](https://knowledge.workspace.google.com/admin/apps/set-up-your-own-custom-saml-app).
If you encounter any issues during setup, refer to the [SAML troubleshooting
guide](overview#troubleshooting) or contact support at [support@datazone.co](mailto:support@datazone.co)